

How to Use Fusion's Trading Calculators (And Why Every Trade Should Start There)
Read Time: 6 minutes
Most traders decide how much to trade by feel. A bit more when they're confident, a bit less when they've just been burnt. It's understandable – and it's the reason two people can run the same strategy and end up with completely different account balances.
The thing is, none of it needs to be guesswork. Every number that matters before you place a trade – what a pip is worth, how much capital gets tied up, what the trade returns if it works, what it costs to hold overnight – can all be answered in about thirty seconds.
The Fusion Markets trading calculators sit across four tabs: Margin, Pip Value, Profit & Loss and Swaps. They're free, they don't require a login, and they pull live conversion rates, so the answers come back in your own account currency.
Here's what each one does, how to use it, and where it fits.
- First, the field that appears on every tab
- The Four Calculators
- Putting them in order
- Two things worth adding manually
- Building the habit
Two inputs show up on all four calculators, so it's worth getting them right once.
Group filters the list of available symbols. Leaving it on "All" is fine for most purposes – it simply shows you everything.
Symbol is the instrument you're pricing. Once you select it, look immediately below the dropdown: the calculator displays the contract size. For XAU/USD it reads 1 lot = 100, meaning one lot controls 100 ounces of gold.
Don't scroll past that line. Contract size is the single most misunderstood number in retail trading, and it's the reason a lot size that feels normal on EUR/USD can be wildly oversized on gold.
Account Base Currency is what your account is denominated in. Set it correctly and every result comes back in dollars you actually recognise, with the conversion already done.
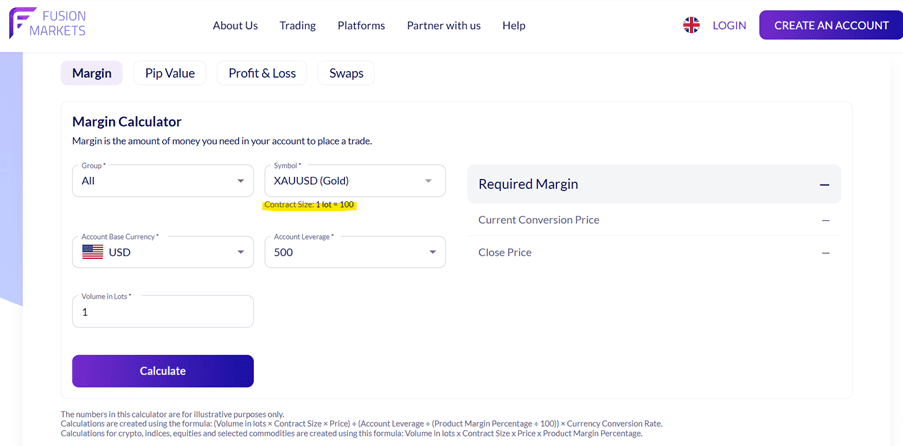
Image 1: Where to find the contract size information.
1. Pip Value Calculator
What it is: it tells you how much money you gain or lose when price moves by one pip.
How to use it: select your symbol, set your account base currency, and enter a volume of 1 lot. Hit Calculate.
Using one lot as your reference makes everything downstream easier – you can scale up or down from there without re-running anything.
What comes back:
- Pip Value in Account Currency – the number you'll actually use.
- Current Conversion Price – the live rate used to convert it.
- Pip Value in Converted Currency – the value in the instrument's own currency, before conversion.
Why it matters: this is the input that makes position sizing possible. The sizing formula is:
Position size = Risk amount ÷ (Stop distance × Pip value)
Say you're on a $10,000 account risking 1% ($100) buying EUR/USD at 1.0850 with a stop at 1.0825. That's a 25 pip stop, and the calculator returns $10 per pip on a standard lot.
$100 ÷ (25 × $10) = 0.4 lots
Widen the stop to 50 pips and the position halves to 0.2 lots. Your risk doesn't move. That's the whole idea – the stop dictates the size, not the other way around.
The trap it saves you from: if you're on an AUD-denominated account trading a USD-quoted instrument, the raw pip value isn't your pip value. The calculator handles that conversion. Doing it in your head is where errors creep in.
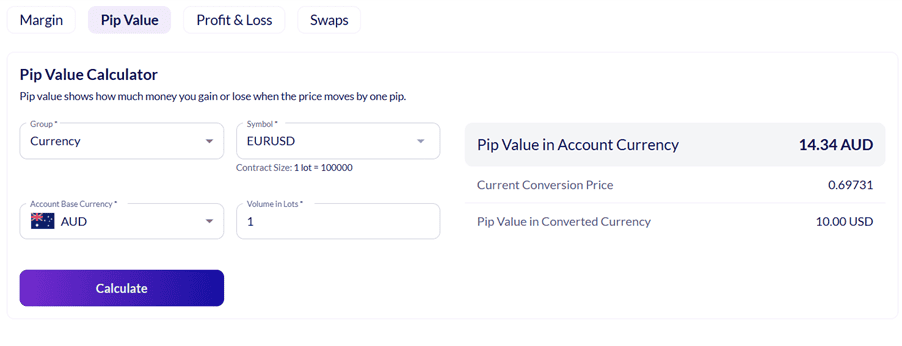
Image 2: Pip Value calculator – EURUSD example with AUD base currency.
2. Margin Calculator
What it is: margin is the amount of money that needs to be sitting in your account to open and hold the trade.
How to use it: same symbol and base currency as before, plus two extra inputs – your account leverage (500:1 in the example screenshot) and the volume in lots you worked out from the pip value step.
What comes back: the required margin, along with the conversion price used to get there.
Why it matters: margin is not risk. People conflate these constantly, and it causes real damage.
Your risk on that EUR/USD trade is $100 – the amount you lose if the stop hits. Your margin is what gets locked up while the position is open, and it's a much larger number. The two are answering different questions:
- Risk asks: what does this cost me if I'm wrong?
- Margin asks: do I have enough free equity to hold this at all?
You can size a position perfectly and still get stopped out by a margin call, simply because you had four other trades open and no headroom left. Running the margin figure before you commit tells you whether the position fits alongside everything else in the account.
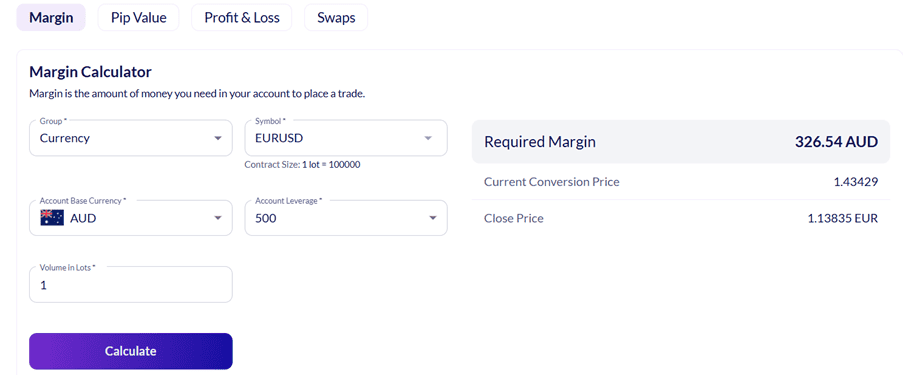
Image 3: Margin Calculator – EURUSD example with AUD base currency.
3. Profit & Loss Calculator
What it is: it shows what you actually make or lose on a trade once it closes.
How to use it: this tab asks for more than the others – symbol, base currency, volume, an Open Price, a Close Price, and a Buy/Sell toggle. Enter your intended entry and your target, select the correct direction, and calculate.
What comes back:
- Profit in Account Currency
- Profit in Symbol Currency
- Current Conversion Rate
- Pip Value
Why it matters: run it twice. Once with your target as the close price, once with your stop.
That gives you the actual dollar reward against the actual dollar risk – your risk-to-reward ratio in money rather than in vague chart terms. A setup that looks generous on a chart can turn out to be risking $100 to make $80. Better to learn that before you're in the trade than after.
It's also the quickest way to pressure-test a "what if" – what if I'd held to the next level, what if I'd sized at half a lot instead of one.
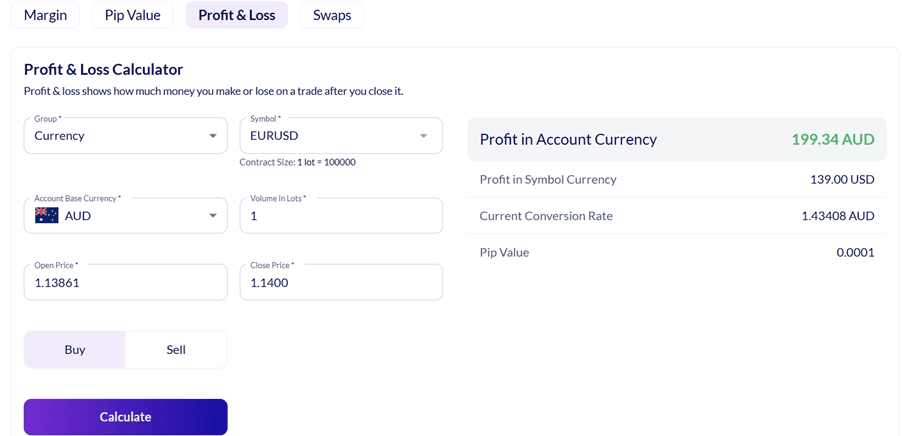
Image 4: Profit & Loss Calculator – EURUSD Buy example with AUD base currency.
4. Swaps Calculator
What it is: swaps are the daily cost – or credit – for holding a position overnight.
How to use it: symbol, base currency, volume. That's all it needs.
What comes back: the daily swap in your account currency, split into Short and Long, plus the underlying swap rates in both the currency pair and the converted currency.
Why it matters: two reasons.
First, direction changes everything. On a given instrument, holding long might cost you while holding short pays you, or vice versa. The Short and Long figures are shown separately for exactly that reason.
Second, swaps compound quietly. A few dollars a night sounds like nothing. Over a three-week swing trade, it can eat a meaningful slice of the profit – and on gold and high-differential currency pairs it's larger than most traders assume. Worth noting too that most brokers apply a triple charge on Wednesdays to cover the weekend.
If you're a day trader closing before rollover, you can ignore this tab entirely. If you hold anything overnight, run it before you commit.
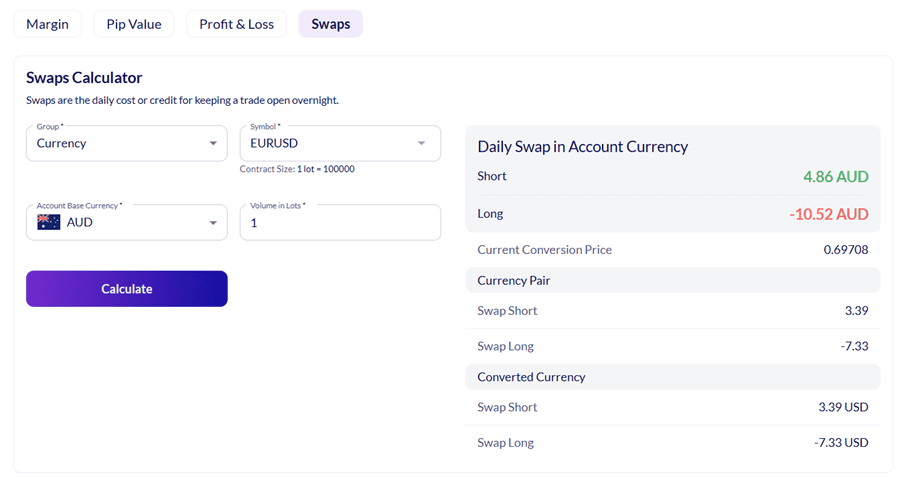
Image 5: Swaps Calculator – EURUSD example with AUD base currency.
Used properly, they run as a sequence – roughly a minute all up:
- Pip Value at 1 lot → gives you the input for the sizing formula.
- Formula → risk ÷ (stop × pip value) = your position size
- Margin at that size → confirms you can actually hold it.
- Profit & Loss at target and at stop → confirms the trade is worth taking.
- Swaps, if you're holding overnight → confirms the carry doesn't erode it.
Skip step one and you're guessing. Skip step three and you might not be able to hold the position through normal noise. Skip step four and you're taking trades whose reward doesn't justify the risk.
The spread. A 25 pip stop with a 1 pip spread is effectively 26 pips of risk. Add the spread to your stop distance before you run the formula – on tight stops the difference is material.
Rounding. Always round your calculated position size down, never up. Rounding 0.083 lots up to 0.09 quietly pushes you past the risk limit you just carefully set.
Bookmark the calculators page and use it before every trade for a fortnight.
After that, you'll be estimating the right size before you've finished drawing the stop, and you'll never place another trade wondering how much it could cost you.
You'll know. To the dollar.
We’ll never share your email with third-parties. Opt-out anytime.